

As you know, every problem has multiple solutions. But we choose only one optimal solution. Today, I am coming with a problem and its optimal solution. I know that you are seeking for the solution of how to use a tongue and groove router bit. I hope that you already know about the straight bit and rabbeting bit and their functionality.

If you are trying to make tongue and groove joints then you can use a straight and rabbeting bit. But if you are trying to use tongue and groove bit then this work becomes more accurate and fine.
Every bit has its specific purpose and use. One router bit can do multiple functionalities. Tongue and groove router bit design for the tongue groove joint purpose. If you are experts then you already the tongue cut and the groove cut.
But if you are a newbie then firstly you need to know what is the tongue cut, and what is the groove cut? It makes your work simpler and easy. If you correctly install this bit then your work becomes accurate and easy. For that purpose, you should have at least two routers: One for cutting the tongue and the other for cutting the groove.
The first question arises when you have a tongue and groove router bit is how to install it? Newbies will never know about that and some experts maybe do faults during installation.
Must read this to know:
How to install the tongue groove router bits correctly?
There are two methods which I am discussing the installation of the bits. I want to make it simpler for you.
- In the first step, cut the tongue. I will tell you about how to cut the tongue in further detail. Here, I am just telling you the setup.
- Install the groove cutter bit and line the tongue board along the router bit. Make sure that the router is unplugged when you are changing the router bit.
- Now adjust the tongue cutter and line up with the tongue. As it is said in the woodwork field the human finger has a resolution of about 1/1000 inch. So, by using finger you can check the groove cutter bit is lined up with the tongue or not.
- Now take another piece of wood and cut the groove on it.
This method will help you to install the bits properly and perfectly.
Now I am going to discuss another method of installing the bits. This method contains a vernier caliper. Let’s start:
- The first step is to cut the tongue.
- Place a rigid metal ruler along the tongue piece to hang the tongue.
- Now using the depth rod of the caliper, measure the distance from the top of the tongue to the shim. With the help of lock screw, lock the reading. Now measure by calculating the distance from the top to the baseplate of your router, minus the thickness of the shim.
- Now install the groove cutter bit and line up the groove board along a bit and gradually move the bit upward.
- Now register the depth gauge along with the groove bit’s cutter.
- Using the router’s micro-adjustment knob, adjust the but downward until the caliper’s depth gauge bottoms out on the shim.
- Now take another piece of wood and cut the tongue.
This is the second method to install the bits. You can use any method which seems to you simple and easy. Correct installation will lead to successful work.
Required things are:
Doing any procedure and experiments you need required things. In this procedure, you need some things. I will tell you about those things that are required.
- Router table
- Scale
- Two pieces of wood
- Tongue and groove router bits
How to use a one-piece tongue and groove router bit?
Here, I will tell you how to use tongue and groove router bits and also how can you make tongue and groove cut and how to join them? The tongue and groove bit comes in at 1-5/8 inch wide. You can make different items like cabinet doors, doors, etc by using tongue and groove router bits.
Sometimes, you see the tongue and groove set comes with two-bit. One bit used to cut the end grain of the wood and the other one is used to cut the groove. But you can do both cuts with the one bit. If you don’t have any tongue groove router bit then go on amazongo on amazon and buy it now.
So let’s start the procedure stepwise.
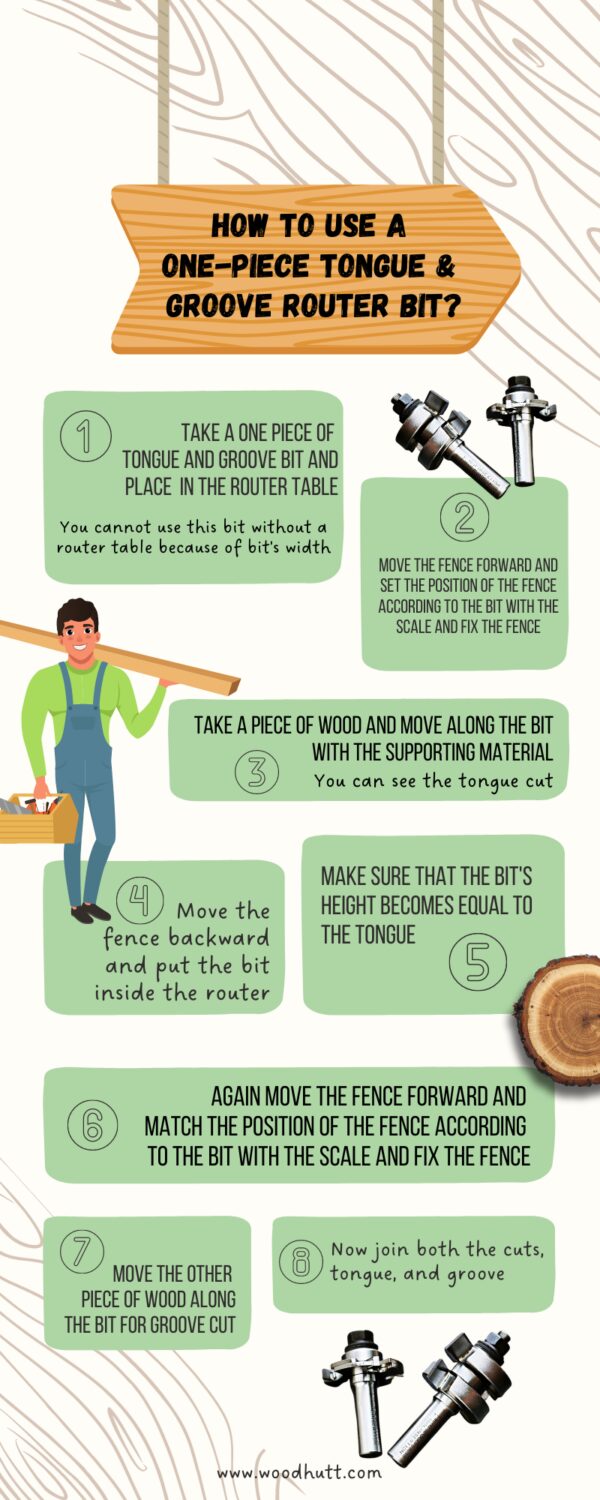
Step 1:
Take a one piece of tongue and groove bit and place in the router table. You cannot use this bit without a router table because of bit’s width.
Step 2:
Move the fence forward and set the position of the fence according to the bit with the scale and fix the fence.
Step 3:
Now firstly, we make a tongue cut. Take a piece of wood and move along the bit with the supporting material. You can see the tongue cut.
Step 4:
Now move the fence backward and put the bit inside the router as seen in the picture. This will help you to make a groove cut.
Step 5:
Make sure that the bit’s height becomes equal to the tongue. Because it is compulsory to fix both the cuts.
Step 6:
Again move the fence forward and match the position of the fence according to the bit with the scale and fix the fence.
Step 7:
Move the other piece of wood along the bit for groove cut. You can see the groove.
Step 8:
Now join both the cuts, tongue, and groove. Your tongue and groove joint is ready with the one piece of tongue and groove router bit. Try it yourself.
If your wood pieces are not properly fixing, you can say that either it is loose or tight to fix. This would happen due to the wrong measurement of bit’s depth. To avoid this problem, I suggest you use both pieces of tongue and groove router bit. An expert can use one piece of bit easier because he/she has an idea of depth and cut. But if you are a newbie then use two pieces of bits which is available on amazon.
How to use two pieces of tongue and groove router bits?

In this method, we will use both bits for tongue and groove cut. This method is similar to the previous method, the difference is that there was only one piece of bit and here, we use two bits separately.
Let’s start:
Step 1:
Take two pieces of tongue and groove bits. One for tongue cut and the other for groove cut.
Step 2:
Place one bit for tongue cut in the router table and adjust the fence and we do in the previous method and fix the fence.
Step 3:
Now move the piece of wood along the bit with the supporting material. You will see the tongue cut.
Step 4:
Now change the router bit and use another but for groove cut. Make sure that the router table is unplugged during changing the router bit.
Step 5:
Move the other piece of wood along the router bit this will give you the groove cut.
Step 6:
Now join both the pieces to check whether it makes a proper and exact cut or not. You can see the proper joints.
Now it’s your turn. Buy these bits and enjoy your woodwork. Best of luck!
Conclusion
Related Articles
Best Router Bits Sets | MLCS, Freud, and Yonico Router Bits
How to use a dovetail router bit?